|
Playback
control is used to start, pause and stop Output Window rendering. The
Time Slider and Time Navigator Slider can be used to navigate the project
time. If the project contains Animation, Keyframes are displayed in the
Timeline.
The time boxes
on the right, display Project current- and total time, the time
format is Minutes:Seconds.Frames.
Total project time can be set by custom input, input in seconds is
automatically converted to the correct time format.
Playback starts
by default with one Output Window, Custom Output Setup as well as resizing
and identification can be access via the [Output] menu.

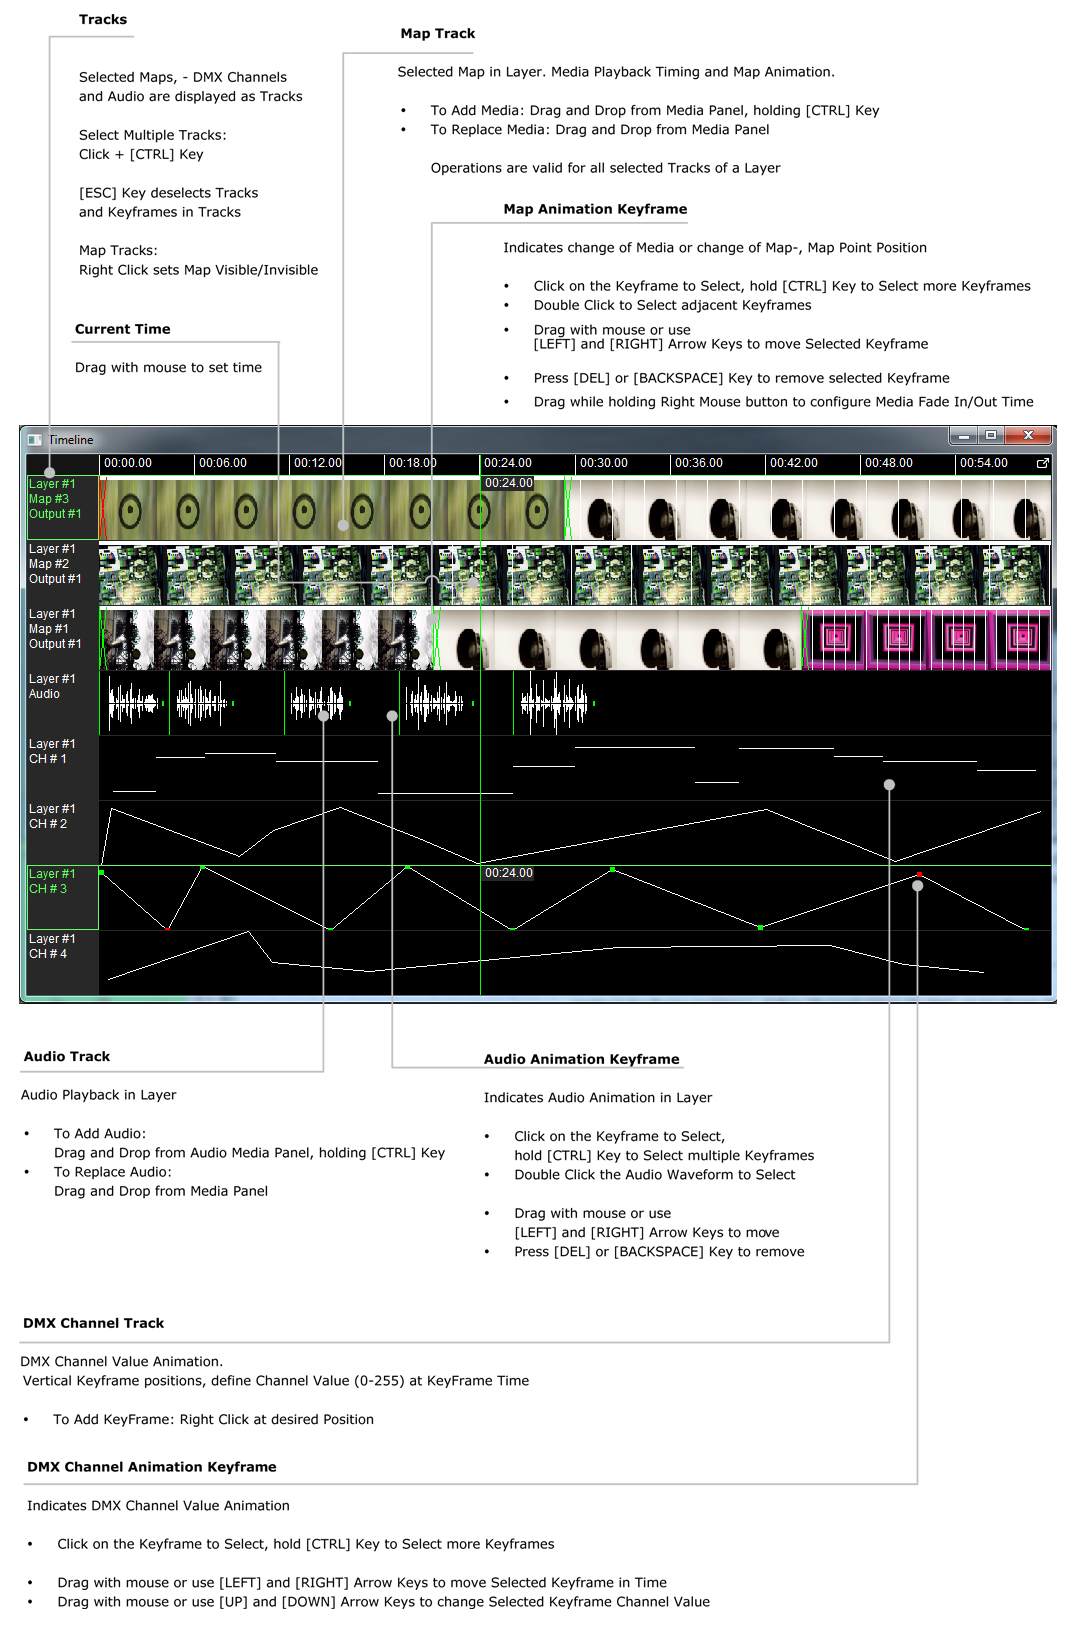
Timeline Window
In Timeline Window, Each
selected Map, Layer Audio, and selected DMX Channels is displayed as
a Track. Keyframes can be easily added and modified
via drag and drop inside the
Timeline Window. The Timeline Window is accessed via Menu [Timeline >  Show Timeline]
|
View Menu
|
View Menu Functions operate on User interface
|
 Media
Media
|
Show Media Panel in all Layers
|
 Mapping
|
Show Mapping Panel in all Layers
|
 Effects
|
Show Effect Panel in all Layers
|
 Selection Groups Selection Groups
|
Show Selection Group Panel in all Layers
|
 Presets
|
Show Preset Panel on all Layers
|
 Color & Alpha
|
Show Color & Alpha Panel in all Layers
|
 LFO
LFO
|
Show LFO Panel in all Layers
|
 DMX DMX
|
Show DMX Panel in all Layers
|
 Cross Hair
|
|
 On Texture Coordinates
|
Toggle Cross hair display in Texture
Coordinates
|
 On Output
|
Toggle Cross Hair display in Output
Window
|
 Hide
Hide
|
Hide Cross Hair from Texture Coordinates and
Output Window
|
 Mapping Grid
|
|
On Texture Coordinates
|
Display Mapping Grid on Texture Coordinates
On/Off
|
On Output
|
Display Mapping Grind in Output On/Off
|
 Detach User Interface
|
User Interface Display Panels can be detached
and arranged in separate Windows. Menu function operates on Selected Layer
|
Media
|
Open Media Panel in separate Window
|
Mapping
|
Open Mapping Panel in separate Window
|
Effects
|
Open Effect Panel in separate Window
|
Selection Groups
|
Open Selection Group Panel in separate
Window
|
Presets
|
Open Preset Panel in separate Window
|
Color & Alpha
|
Open Color & Alpha Panel in separate
Window
|
LFO
|
Open LFO Panel in separate Window
|
DMX
|
Open DMX Panel in separate Window
|
 Texture Coordinates
|
Open Texture Coordinates in separate Window
|
Playback Menu
|
Playback Menu functions
operate on Project Time
|
 Start
Start
|
Starts playback, same function as Start
Button.
|
 Pause
Pause
|
Pauses playback, same function as Pause
Button.
|
 Goto Start
|
Positions Time to Project Start time or Marker
Start Time, if set.
|
 Goto End
|
Positions Time to Project End time or Maker End Time, if set.
|
 Stop
Stop
|
Stop playback.
|
 Faster
|
Faster Project playback.
|
 Slower
|
Slower Project playback.
|
 Normal Speed
|
Normal Project playback.
|